OVERVIEW
In order to use the Publisher API, you will need to register an application via System admin, and then authorise a user (or many) to access that API. This is done via OAuth. Upon authentication, this user will be assigned an Authentication token which will need to be sent with each and every API call to identify which user is making the call.
Step 1: Register application
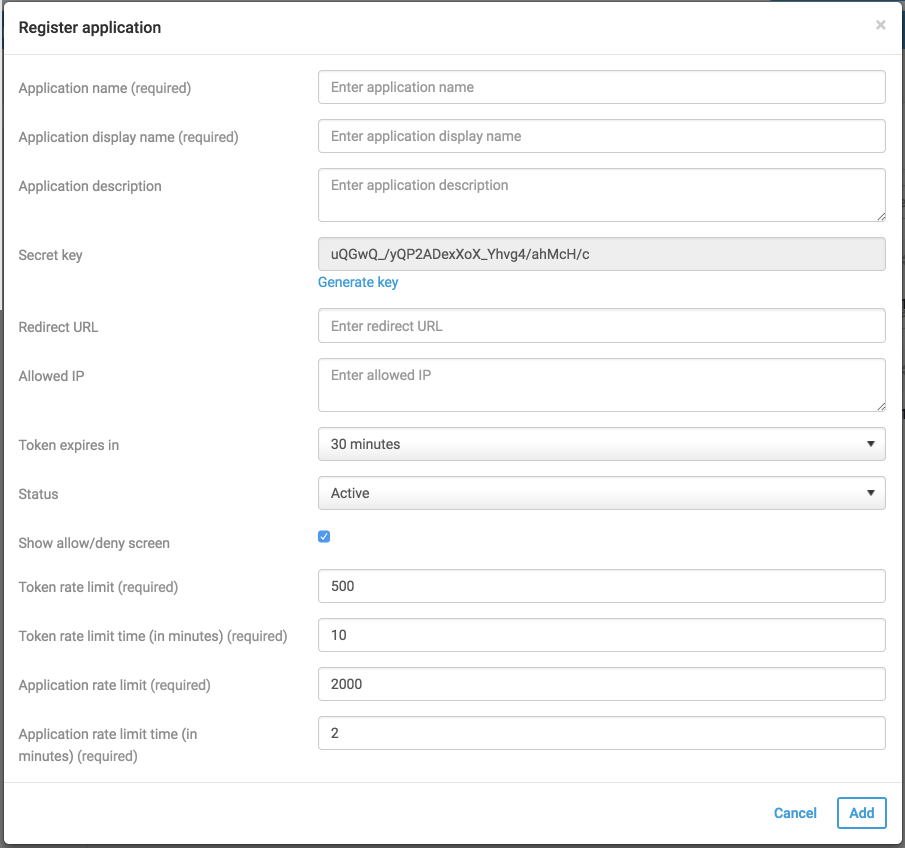
Register application at: https://<instance name>/<application context name>/listAPIRegistration.action
- As with the registration of applications for the Collaborate API, there are a number of settings that can be modified for each application that is registered:
- Application name - used by administrators to see which application is which
- Application display name - used by any external views to identify the application
- Application description
- Secret key - can be manually replaced by generating a new key
- Redirect URL - after registration is complete, this page is where a user is redirected to
- Allowed IP - a comma separated list of allowed IPs
- Token expires in - manually set token expiration duration
- Status - activate/disable an application
- Show allow/deny screen
- Token rate limit
- Token rate limit time (in minutes)
- Application rate limit
- Application rate limit time (in minutes)

Step 2: Generate Authentication code
Retrieve your assigned Client Id and Redirect URL.
- Generate your authentication code at: https://<instance name>/<application context name>/authorise.action?response_type=code&client_id=<Client Id>&redirect_uri=<Redirect URL>
- If you have not got an active Publisher session, you will be asked to log in with the credentials you want to authorise to access the API
- If "Show allow/deny" screen is set to true, you will be asked to confirm access to the API
- You will be redirected to your Redirect URL with a URL parameter "code" added: <Redirect URL>?code=<Authentication code>
Step 3: Generate Access token
Retrieve your Client Id, Secret key and Authentication code
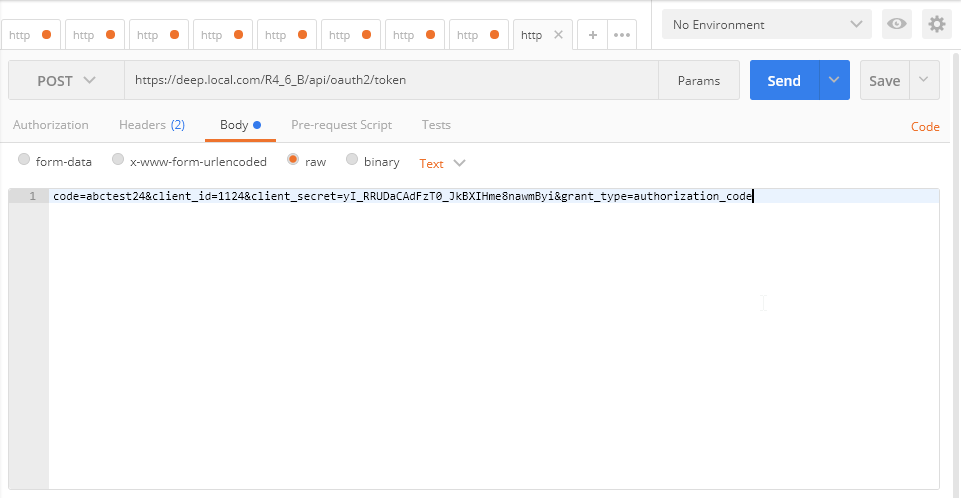
- Open your choice of REST Client, this walkthrough will show Postman
- Via HTTP POST:
- Set URL as https://<instance name>/<application context name>/api/oauth2/token
- Set REST call type as POST
- In Headers tab, set Content-Type = application/x-form-urlencoded
- In Headers tab, set Accept = application/xml OR application/json (Optional, If this header is not set then the response will be in JSON By default)
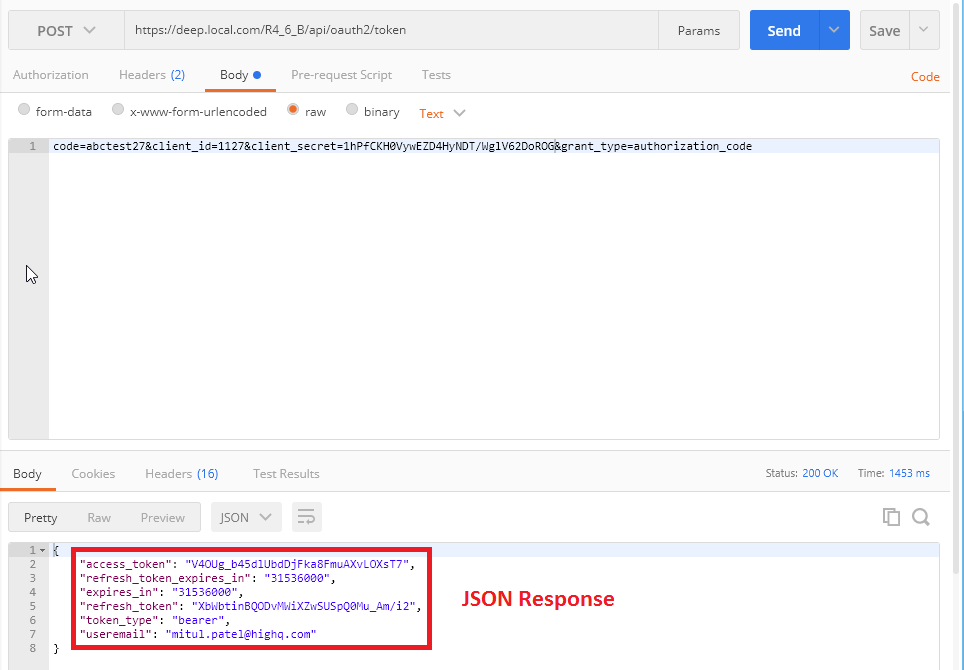
- In Body tab choose your preferred method (here it's raw) and enter the parameters below:
code=<Authentication code>&client_id=<Client Id>&client_secret=<Client secret>&grant_type=authorization_code

- Click on Send. Publisher will return a HTTP response in your choice of format: JSON(Default) or XML (If set in Accept header)

Step 4: Generate refresh token
Your access token will only stay active for the amount of time specified when you registered your application. When this token expires, you will need to generate a new token using your Refresh token
- As with generating an access token, open your choice of REST Client, this walkthrough will show Postman
- Via HTTP POST:
- Set URL as https://<instance name>/<application context name>/api/oauth2/token
- Set REST call type as POST
- In Headers tab, set Content-Type = application/x-form-urlencoded
- In Headers tab, set Accept = application/xml OR application/json (Optional, If this header is not set then the response will be in JSON By default)
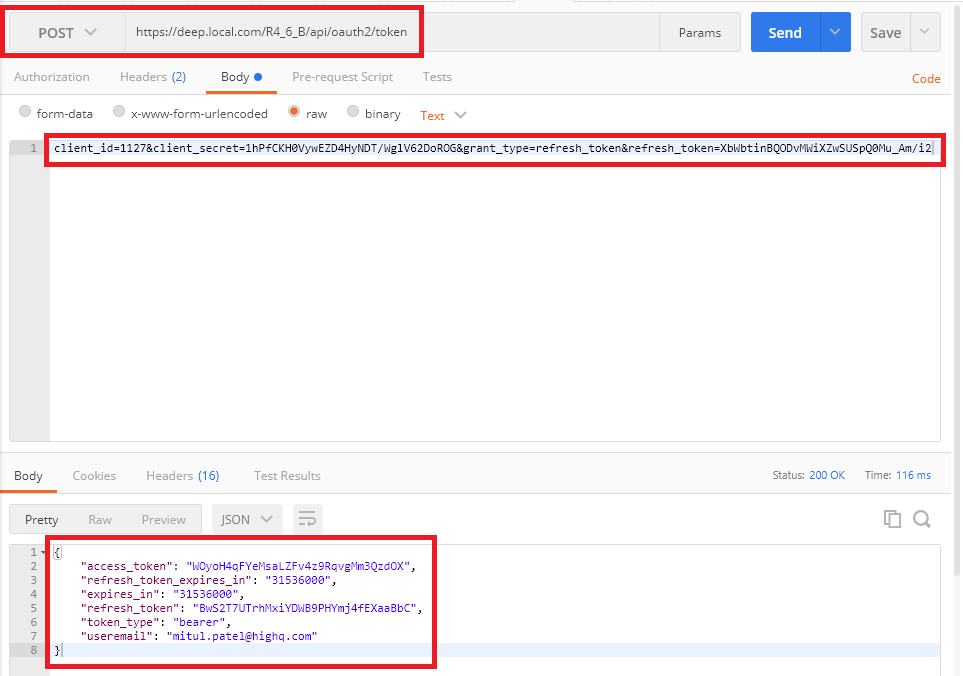
- In Body tab choose your preferred method (here it's raw) and enter the parameters below:
client_id=<Client id>&client_secret=<Client secret>&grant_type=refresh_token&refresh_token=<Refresh token>
- Click on Send. Publisher will return a HTTP response in your choice of format: JSON(Default) or XML (If set in Accept header)

what is the meaning of this ? and how do i know if i have got active publisher session?
If you have not got an active Publisher session, you will be asked to log in with the credentials you want to authorise to access the API
Thank you.
There you go Jim Massey, documentation updated to reflect the correct 'application/{MIME type}' for the accept headers.
For anyone else who gets the same issue as I did, the fix was to change the "Accept" HTTP header from "text/json" to "*/*".
It appears the documentation and/or the API need to be updated.
Jim Massey Can you please raise a ticket with support@highq.com and we'll get an investigation raised? Thanks


Comments
9 Comments