Using the generic connector for AI - Configuration on HighQ
OVERVIEW
Adding a new AI service to a HighQ instance
Follow these steps to use the HighQ AI Hub with a new AI engine:
- Request HighQ support to enable the AI Hub (if not already enabled) and the 'Generic connector for AI' capability on the target HighQ instance
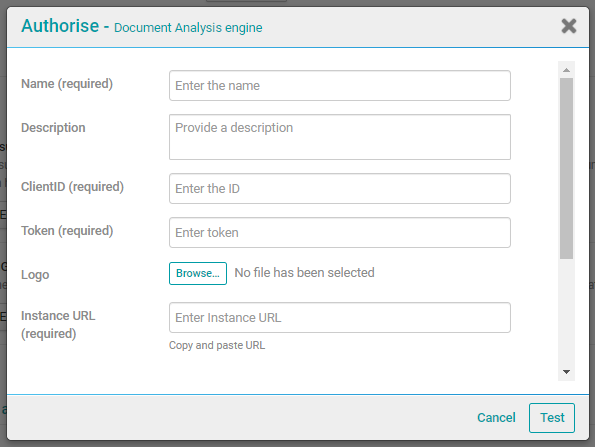
- Once the AI Hub and the generic connector are enabled, the System Administrator for your target HighQ instance must configure the connection to your AI service. This includes entering credentials you (as the service operator) have provided that permit the HighQ instance to connect to and authenticate on your service; such as the URL, the client key and the secret key.
The connection will be tested at this point, and if there is an error with the configuration, the System Administrator will see an error message and will not be able to save the configuration. Contact your HighQ Support team if you are unable to connect, as they will be able to engage with the engineering team to assist with root cause analysis - Once the connection is made to your AI service by the System Administrator in HighQ, then Site Administrators can see your AI service in their list of AI services on their sites. They can choose to enable your service in the AI Hub, and select files to send to your service for processing. They can also select metadata from your service to map back to HighQ iSheets

Detailed steps for configuring and enabling your AI service at System and Site level are found in the HighQ Knowledge Centre, which is accessible in any HighQ instance. Click your profile in the top right of your screen then select 'Help', or click this link:
Authorise and set up a generic AI engine
Defining an AI service
The HighQ AI Hub requires an AI service to provide a set of standard API endpoints in order to function, as described in the section below. In addition, a service must have a minimum set of information so that it can be added to the AI Hub. Some additional information is optional, to improve the experience for users and add brand exposure on the HighQ platform.
Note that the same AI service can be added multiple times to the same HighQ instance, so long as it is given a unique name. You may, for example, have multiple AI services configured as staging and production environments, so you can choose to add separate connections to each service in order to separate testing and production usage of your AI service.

Required information:
- Name – a unique name on the HighQ instance
- Client ID – a unique code to identify the HighQ instance as a specific client in your application
- Token – a unique secret key to authenticate the Client ID, generated by your application to match with the Client ID. When both are provided together, the requesting service (HighQ AI Hub) can be authenticated and it is safe to return an authorisation token
- Instance URL – the root URL where all APIs will be hosted
The following information is not required, but improve the experience for your users in HighQ and promotes your brand on the platform:
- Description – this is an opportunity to provide a short description of your AI service. Up to 500 words can be used to explain the best use cases for the service, or the technology used. This information is shown to HighQ Site Administrators when they use the AI Hub to enable AI services
- Logo – this is a small (40px square) icon that is shown alongside your service name and description, and is an opportunity to show your brand to Site Administrators in the HighQ AI Hub. Valid formats include .JPG and .PNG


Comments
0 Comments